《第一行代码》第2版思维导图及所有学习笔记目录
多线程编程 线程基本用法 方式一:
1
2
3
4
5
class MyThread extends Thread { public void run () {} } new MyThread ().start();
方式二:
1
2
3
4
5
class MyThread implements Runnable { public void run () {} } new Thread (new MyThread ()).start();
方式三:
1
2
3
new Thread (new Runnable () { public void run () {} }).start();
在子线程中更新UI 直接在子线程中更新UI将导致APP崩溃,所以正确做法是通过异步消息处理机制来实现。譬如按键实现更新UI:
1
2
3
4
5
6
7
8
9
10
11
12
13
14
15
16
17
18
19
20
21
22
public static final int UPDATE_TEXT = 1 ;onClick() { new Thread (new Runnable () { public void run () { Message message = new Message (); message.what = UPDATE_TEXT; handler.sendMessage(message); } }).start(); } private Handler handler = new Handler () { public void handleMessage (Message msg) { switch (msg.what) { case UPDATE_TEXT: break ; ... } } }
另一种在子线程更新UI的快捷方式:
1 2 3 4 5 6 runOnUiThread(new RUnnable () { @Override public void run { } });
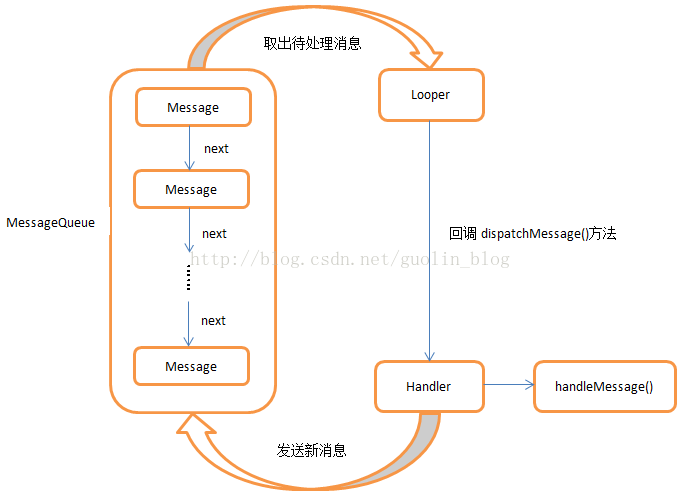
异步消息处理机制 Android的异步消息处理主要由四个部分组成:
Message
Handler
MessageQueue
Looper
流程示意图如下:
AsyncTask AsyncTask的一个简单示例:
1 2 3 4 5 6 7 8 9 10 11 12 13 14 15 16 17 18 19 20 21 22 23 24 25 26 27 28 29 30 31 32 33 34 35 36 37 38 39 40 41 42 43 44 45 class DownloadTask extends AsyncTask <Void, Integer, Boolean> { @Override protected void onPreExecute () { progressDialog.show(); } @Override protected Boolean doInBackground (Void... params) { try { while (true ) { int downloadPercent = doDownload(); publishProgress(downloadPercent); if (donwloadPercent >= 100 ) { break ; } } } ... return true ; } @Override protected void onProgressUpdate (Integer... values) { progressDialog.setMessage("Downloaded" + values[0 ]+"%" ); } @Override protected void onPostExecute ( Boolean result) { progressDialog.dismiss(); if (result) {} else {} } } new DownloadTask ().execute();
服务基本用法 定义服务 创建服务时两个属性:Exported - 是否允许其他程序访问,Enabled - 启用服务。示例:
1
2
3
4
5
6
7
8
9
10
11
12
13
14
15
16
17
18
19
20
21
22
23
24
25
26
27
28
public class MyService extends Service { public MyService () { } @Override public void onCreate () { super .onCreate(); } @Override public int onStartCommand (Intent intent, int flags, int startId) { return super .onStartCommand(intent, flags, startId); } @Override public void onDestroy () { super .onDestroy(); } @Override public IBinder onBind (Intent intent) { ... } }
启动和停止服务 1 2 3 4 5 6 7 # 启动服务 Intent startIntent = new Intent (this , MyService.class);startService(startIntent); # 停止服务 Intent stopIntent = new Intent (this , MyService.class);stopService(stopIntent);
活动与服务通信 让MyService提供下载功能,并活动可以决定下载时间和查看进度,添加通信代码:
1 2 3 4 5 6 7 8 9 10 11 12 13 14 15 16 17 18 19 20 21 22 23 24 25 26 27 28 29 30 31 32 33 34 35 36 37 38 39 40 41 42 # 服务部分 public class MyService extends Service { @Override public IBinder onBind (Intent intent) { return mBinder; } private DownloadBinder mBinder = new DownloadBinder (); class DownloadBinder extends Binder { public void startDownload () {} public int getProgress () {} } ... } # 活动部分 实现匿名类: private MyService.DownloadBinder downloadBinder; private ServiceConnection connection= new ServiceConnection () { @Override public void onServiceConnected (ComponentName name, IBinder service) { downloadBinder= (MyService.DownloadBinder) service; downloadBinder.startDownload(); downloadBinder.getProgress(); } @Override public void onServiceDisconnected (ComponentName name) { } }; 绑定服务: Intent bindIntent = new Intent (this ,MyService.class); bindService(bindIntent,connection,BIND_AUTO_CREATE); 解绑服务: unbindService(connection);
前台服务 前台服务可以一直处于运行状态,而不会被垃圾回收,并且会在系统状态栏显示。一个简单的示例:
1
2
3
4
5
6
7
8
9
10
11
12
13
14
15
@Override public void onCreate () { super .onCreate(); Intent intent = new Intent (this ,MainActivity.class); PendingIntent pendingIntent = PendingIntent.getActivity(this ,0 ,intent,0 ); Notification notification = new NotificationCompat .Builder(this ) .setContentTitle("This is a content title!" ) .setContentText("this is a content text!" ) .setWhen(System.currentTimeMillis()) .setSmallIcon(R.mipmap.ic_launcher) .setLargeIcon(BitmapFactory.decodeResource(getResources(),R.mipmap.ic_launcher)) .setContentIntent(pendingIntent) .build(); startForeground(1 ,notification); }
使用IntentService 服务默认运行于主线程 ,所以耗时逻辑得通过多线程技术处理。IntentService的好处就是新开线程来处理耗时操作。
1
2
3
4
5
6
7
8
9
onStartCommand(){ new Thread (new Runnable () { @Override public void run () { stopSelf(); } }).start(); }
IntentService方式:
AS自动创建IntentService会生成一大堆用不到的代码,因此手动创建
1
2
3
4
5
6
7
8
9
10
11
12
13
14
15
16
17
18
19
20
21
22
public class MyIntentService extends IntentService { public MyIntentService () { super ("MyIntentService" ); } @Override protected void onHandleIntent (Intent intent) { } @Override public void onDestroy () { super .onDestroy(); } } # 启动IntentService Intent intent = new Intent (MainActivity.this , MyIntentService.class);startService(intent); # 注册 <service android:name=".MyIntentService" />