前段时间开始了利用空闲时间做一个练习APP ForMe。根据设计APP需要通过左边导航栏切换主界面功能,自己平时在使用Google的NewsTab,觉得很不错,就准备参考其界面来设计。

尝试通过NavigationView实现
首选的是通过DrawerLayout和NavigationView来实现,首先引入依赖:
1
2
| compile 'com.android.support:design:25.3.1'
compile 'de.hdodenhof:circleimageview:2.1.0' // 对头布局头像处理提供支持
|
然后实现侧边栏头布局:
1
2
3
4
5
6
7
8
9
10
11
12
13
14
15
16
17
18
19
20
21
22
23
24
25
26
27
28
29
30
31
| <?xml version="1.0" encoding="utf-8"?>
<RelativeLayout xmlns:android="http://schemas.android.com/apk/res/android"
android:layout_width="match_parent"
android:layout_height="180dp"
android:padding="10dp"
android:background="?attr/colorPrimary">
<de.hdodenhof.circleimageview.CircleImageView
android:id="@+id/nav_icon"
android:layout_width="70dp"
android:layout_height="70dp"
android:layout_centerInParent="true"
android:src="@drawable/lee"/>
<TextView android:layout_width="wrap_content"
android:layout_height="wrap_content"
android:textColor="#fff"
android:layout_above="@+id/mail"
android:id="@+id/usr"
android:textSize="15sp"
android:text="@string/me"/>
<TextView android:layout_width="wrap_content"
android:layout_height="wrap_content"
android:id="@+id/mail"
android:text="huaqianlee@gmail.com"
android:layout_alignParentBottom="true"
android:textSize="15sp"
android:textColor="#fff"
/>
</RelativeLayout>
|
实现菜单:
1
2
3
4
5
6
7
8
9
10
11
12
13
14
15
16
17
18
19
20
21
22
23
24
25
| <?xml version="1.0" encoding="utf-8"?>
<menu xmlns:android="http://schemas.android.com/apk/res/android">
<group android:checkableBehavior="single"> //指定这一组菜单项单选 , group可以添加横线
<item
android:id="@+id/nav_call"
android:icon="@drawable/nav_call"
android:title="Call"/>
<item
android:id="@+id/nav_friends"
android:icon="@drawable/nav_friends"
android:title="Friends"/>
<item
android:id="@+id/nav_location"
android:icon="@drawable/nav_location"
android:title="Location"/>
<item
android:id="@+id/nav_mail"
android:icon="@drawable/nav_mail"
android:title="Mail"/>
<item
android:id="@+id/nav_task"
android:icon="@drawable/nav_task"
android:title="Tasks"/>
</group>
</menu>
|
引入布局:
1
2
3
4
5
6
7
8
9
10
11
12
13
14
15
16
17
18
19
20
21
22
23
24
25
26
27
28
29
30
31
32
33
| <?xml version="1.0" encoding="utf-8"?>
<android.support.v4.widget.DrawerLayout
xmlns:android="http://schemas.android.com/apk/res/android"
xmlns:tools="http://schemas.android.com/tools"
xmlns:app="http://schemas.android.com/apk/res-auto"
android:id="@+id/drawer_layout"
android:layout_width="match_parent"
android:layout_height="match_parent"
tools:context="me.huaqianlee.forme.MainActivity">
<!--xmlns:app="http://schemas.android.com/apk/me.huaqianlee.forme"-->
<android.support.design.widget.CoordinatorLayout
android:layout_width="match_parent"
android:layout_height="match_parent">
<android.support.v7.widget.Toolbar
android:id="@+id/tool_bar"
android:layout_width="match_parent"
android:layout_height="?attr/actionBarSize"
android:background="@color/colorPrimary"
android:theme="@style/ThemeOverlay.AppCompat.Dark.ActionBar"
app:popupTheme="@style/Theme.AppCompat.Light"
app:layout_scrollFlags="enterAlways|snap|scroll"
>
</android.support.v7.widget.Toolbar>
</android.support.design.widget.CoordinatorLayout>
<android.support.design.widget.NavigationView
android:id="@+id/nav_view"
android:layout_width="wrap_content"
android:layout_height="wrap_content"
app:headerLayout="@layout/nav_header"
app:menu="@menu/nav_menu"
/>
|
使能侧边栏提示图标:
1
2
3
4
5
6
| DrawerLayout mlayout = (DrawerLayout) findViewById(R.id.drawer_layout);
ActionBar actionBar = getSupportActionBar();//获得ToolBar
if (actionBar != null) {
actionBar.setDisplayHomeAsUpEnabled(true);
actionBar.setHomeAsUpIndicator(R.drawable.ic_menu); //设置图标,默认是一个箭头
}
|
好了,这样子效果就出来了:
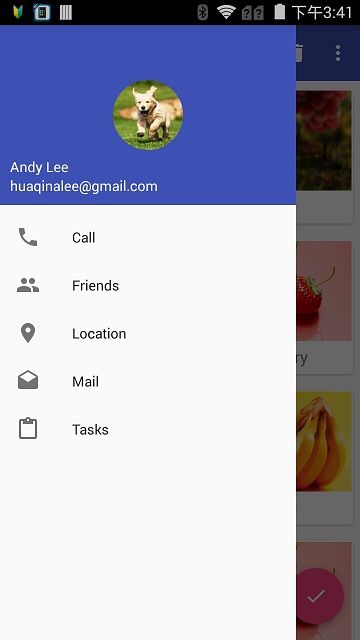
可是这样子只能做到菜单式的侧边栏,不能实现我的需求。我尝试着找到一种方式来实现卡片式显示,但是最终没能找到。
自定义卡片式侧边栏
既然用google提供库文件不能实现,就只好选择自定义来实现了.
在DrawerLayout中自己定义布局,将侧边栏头布局引入,然后通过RecyclerView来实现卡片式显示.
在开始前,首先得引入相应的依赖,如下:
1
2
| compile 'com.android.support:recyclerview-v7:25.3.1'
compile 'com.android.support:cardview-v7:25.3.1'
|
实现侧边栏的布局:
1
2
3
4
5
6
7
8
9
10
11
12
13
14
15
16
17
18
19
20
21
22
23
24
25
26
27
28
29
30
31
32
33
34
35
36
37
38
39
40
41
42
43
44
45
46
47
48
49
50
51
52
53
54
55
56
57
58
59
60
61
62
63
64
65
66
67
68
69
70
71
72
73
74
75
76
77
78
79
80
81
82
83
84
85
86
87
88
89
90
91
92
93
94
| <?xml version="1.0" encoding="utf-8"?>
<android.support.v4.widget.DrawerLayout
xmlns:android="http://schemas.android.com/apk/res/android"
xmlns:tools="http://schemas.android.com/tools"
xmlns:app="http://schemas.android.com/apk/res-auto"
android:id="@+id/drawer_layout"
android:layout_width="match_parent"
android:layout_height="match_parent"
tools:context="me.huaqianlee.forme.MainActivity">
<!--xmlns:app="http://schemas.android.com/apk/me.huaqianlee.forme"-->
<android.support.design.widget.CoordinatorLayout
android:layout_width="match_parent"
android:layout_height="match_parent">
<android.support.v7.widget.Toolbar
android:id="@+id/tool_bar"
android:layout_width="match_parent"
android:layout_height="?attr/actionBarSize"
android:background="@color/colorPrimary"
android:theme="@style/ThemeOverlay.AppCompat.Dark.ActionBar"
app:popupTheme="@style/Theme.AppCompat.Light"
app:layout_scrollFlags="enterAlways|snap|scroll"
>
</android.support.v7.widget.Toolbar>
<FrameLayout
android:layout_width="match_parent"
android:layout_height="match_parent"
>
<ImageView
android:layout_width="match_parent"
android:layout_height="match_parent"
android:src="@drawable/lee"/>
</FrameLayout>
</android.support.design.widget.CoordinatorLayout>
<RelativeLayout android:layout_width="match_parent"
android:layout_height="match_parent"
android:layout_gravity="start">
<RelativeLayout xmlns:android="http://schemas.android.com/apk/res/android"
android:layout_width="match_parent"
android:layout_height="180dp"
android:id="@+id/nav_layout"
android:padding="10dp"
android:background="?attr/colorPrimary">
<de.hdodenhof.circleimageview.CircleImageView
android:id="@+id/nav_icon"
android:layout_width="70dp"
android:layout_height="70dp"
android:layout_centerInParent="true"
android:src="@drawable/lee"/>
<TextView android:layout_width="wrap_content"
android:layout_height="wrap_content"
android:textColor="#fff"
android:layout_above="@+id/mail"
android:id="@+id/usr"
android:textSize="15sp"
android:text="@string/me"/>
<TextView android:layout_width="wrap_content"
android:layout_height="wrap_content"
android:id="@+id/mail"
android:text="huaqianlee@gmail.com"
android:layout_alignParentBottom="true"
android:textSize="15sp"
android:textColor="#fff"
/>
</RelativeLayout>
<FrameLayout
android:layout_width="match_parent"
android:layout_height="match_parent"
android:background="#fff"
android:layout_below="@+id/nav_layout">
<android.support.v7.widget.RecyclerView
android:id="@+id/nav_recycler_view"
android:layout_width="match_parent"
android:layout_height="match_parent">
</android.support.v7.widget.RecyclerView>
</FrameLayout>
</RelativeLayout>
</android.support.v4.widget.DrawerLayout>
|
在写相关代码之前,先写好卡片的布局文件:
1
2
3
4
5
6
7
8
9
10
11
12
13
14
15
16
17
18
19
20
21
22
23
24
25
26
27
28
29
30
| <?xml version="1.0" encoding="utf-8"?>
<android.support.v7.widget.CardView
xmlns:android="http://schemas.android.com/apk/res/android"
xmlns:app="http://schemas.android.com/apk/res-auto"
android:layout_width="match_parent"
android:layout_height="wrap_content"
android:layout_margin="2dp"
app:cardCornerRadius="4dp">
<LinearLayout
android:id="@+id/nav_func_layout"
android:layout_width="match_parent"
android:layout_height="wrap_content"
android:background="#fff"
android:orientation="vertical">
<ImageView
android:id="@+id/nav_func_image" android:layout_margin="10dp" android:layout_width="match_parent" android:layout_height="100dp"
android:background="@color/colorPrimary"
android:scaleType="centerCrop"/>
<TextView
android:id="@+id/nav_func_name"
android:layout_margin="5dp"
android:textSize="16sp"
android:layout_gravity="center"
android:layout_width="wrap_content"
android:layout_height="wrap_content"/>
</LinearLayout>
</android.support.v7.widget.CardView>
|
接下来就该卡片显示(RecylerView)的代码了。
首先实现卡片bean:
1
2
3
4
5
6
7
8
9
10
11
12
13
14
15
16
17
18
19
20
21
22
23
24
25
26
27
28
| package me.huaqianlee.forme.bean;
public class Func {
private String name;
private int imageId;
public Func(){}
public Func (String name, int imageId) {
this.name = name;
this.imageId = imageId;
}
public String getName() {
return name;
}
public void setName(String name) {
this.name = name;
}
public int getImageId() {
return imageId;
}
public void setImageId(int imageId) {
this.imageId = imageId;
}
}
|
实现Adapter:
1
2
3
4
5
6
7
8
9
10
11
12
13
14
15
16
17
18
19
20
21
22
23
24
25
26
27
28
29
30
31
32
33
34
35
36
37
38
39
40
41
42
43
| public class NavFuncAdapter extends RecyclerView.Adapter<NavFuncAdapter.ViewHolder> {
private Context mContext;
private List<Func> mLists;
public NavFuncAdapter(List<Func> lists) {
mLists = lists;
}
@Override
public ViewHolder onCreateViewHolder(ViewGroup parent, int viewType) {
if (mContext == null) {
mContext = parent.getContext();
}
View view = LayoutInflater.from(mContext).inflate(R.layout.func_item, parent, false);
return new ViewHolder(view);
}
@Override
public void onBindViewHolder(ViewHolder holder, int position) {
Func func = mLists.get(position);
holder.funcName.setText(func.getName());
Glide.with(mContext).load(func.getImageId()).into(holder.funcImage);
}
@Override
public int getItemCount() {
return mLists.size();
}
public class ViewHolder extends RecyclerView.ViewHolder {
CardView cardView;
ImageView funcImage;
TextView funcName;
public ViewHolder(View itemView) {
super(itemView);
cardView = (CardView) itemView;
funcImage = (ImageView) itemView.findViewById(R.id.nav_func_image);
funcName = (TextView) itemView.findViewById(R.id.nav_func_name);
}
}
}
|
添加卡片显示代码:
1
2
3
4
5
6
7
8
9
10
11
12
13
14
15
16
17
18
19
20
21
22
23
24
25
|
private Func [] funcs = {new Func ("Call",R.drawable.nav_call),new Func("Friends",R.drawable.nav_friends),new Func("Location",R.drawable.nav_location),
new Func("Mail", R.drawable.nav_mail), new Func("Tasks",R.drawable.nav_task)};
private void initFunc() {
funcList.clear();
Func toDoFunc = new Func();
toDoFunc.setImageId(R.drawable.todo_icon);
toDoFunc.setName("ToDO");
funcList.add(toDoFunc);
Func toDoFunc2 = new Func("Lee", R.drawable.lee);
funcList.add(toDoFunc2);
for (int i = 0; i<funcs.length;i++) {
funcList.add(funcs[i]);
}
}
initFunc();
RecyclerView recyclerView = (RecyclerView) findViewById(R.id.nav_recycler_view);
GridLayoutManager layoutManager = new GridLayoutManager(this,2);
recyclerView.setLayoutManager(layoutManager);
NavFuncAdapter adapter = new NavFuncAdapter(funcList);
recyclerView.setAdapter(adapter);
|
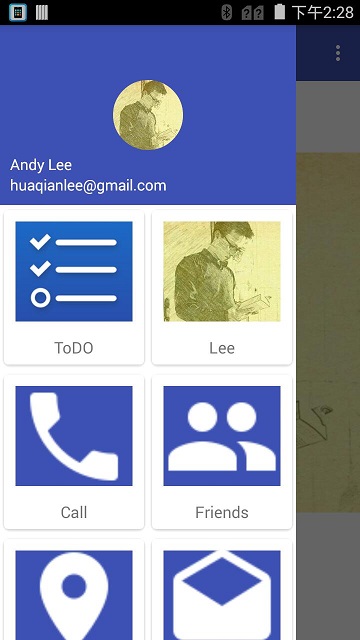
这样子就实现了卡片式侧边栏了,效果如下:
Item选中效果的实现方式见:RecyclerView选中效果的实现 .
今天先这样子粗糙地写这篇博客,后续完善了有时间再更新一下。